Introduction
Growing snowflakes in a bottle can be a fun demonstration to show your students, or they can grow their own snowflakes in class or at home. This is accomplished by using household materials and dry ice. Purchase dry ice from local grocery stores or companies that supply ice.
Topics covered: crystallization, crystal structure
Materials Needed (per setup)
- Growing Chamber (500-mL plastic water bottle, preferably with no ridges at the bottom)
- 3 Large (20 oz) Foam Cups, 1-L Container, Tall Deli Container, or 4-c Measuring Pitcher
- Small Sponge, 1/2” thick
- Nylon Filament Fishing Line (2- to 4-lb test), 1 ft
- Standard Paper Clip
- Ice Pick
- 4 Straight Pins
- Paper Towels
- Dish Towel
- 2 to 3 lb Dry Ice
- Goggles
- Hammer
- Insulated Gloves
- Sharp Knife
- Scissors
- Large Spoon or Scoop
- Tap Water
- Transparent Tape
Background
The moist sponge in the top of the bottle creates a supersaturated atmosphere having a humidity of 200%, which is highly unstable. As warm moist air at the top diffuses downward to meet the extremely cold air (below 0° C) in the middle of the bottle, snow crystals will form on the fishing line. The purpose of the line is to provide a nucleation site for ice crystals to start their growth. Small imperfections on the line provide a surface upon which water molecules can bond and immediately freeze. This is the beginning of do-it-yourself snowflakes. Natural snowflakes form similarly as ice bonds around microscopic dust and particulates in the air.
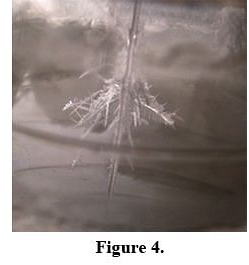
Temperature and humidity influence the type of snow crystals that form. At the coldest location in the chamber (—15° C), fern-shaped dendrites form on the fishing line. These have symmetrical branches that are 60° from the center stem. A little higher on the line, at a temperature of —5° C, are fishbone crystals that look like fish skeletons.
Additional Reading
Recommended Safety
Teacher Prep and Disposal
- Empty a 500-mL water bottle and screw the cap on tightly.
- Lay the bottle horizontally on a counter and use a sharp knife to make a small hole 1/2” from the bottom of the bottle.
Student Preparation
- Insert scissors into the small hole and make a circular cut all the way around the bottom of the bottle; remove the bottom.
- Place the bottom, open end down, on a 1/2”-thick sponge. Using scissors, cut a circle in the sponge that is the same diameter as the bottle bottom.
- Insert the sponge into the mouth of the bottom and secure it with 4 straight pins inserted from the outside.
- Carefully make a hole in the center of the bottle bottom and sponge with an ice pick.
- Thread a fishing line through the center hole in the bottom and sponge.
- Tie a knot around a paper clip at the opposite end of the fishing line, away from the sponge.
- Invert the bottle, place the fishing line with paper clip inside, and place the bottom with sponge back onto the bottle.
- Adjust the length of the fishing line so that the paper clip swings freely inside the bottle, just above the screw cap.
- Use a piece of transparent tape to secure the other end of the fishing line to the outside of the bottle bottom.
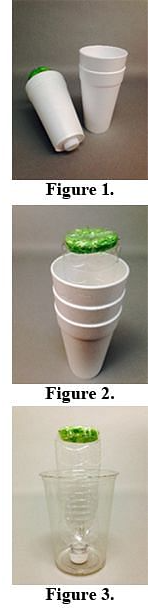
- If you have three 20-oz foam cups, in the bottom of 1 foam cup cut a hole that is the diameter of the bottle cap. Place the bottle cap (still screwed onto the bottle) into that hole (Fig. 1).
- Place the foam cup containing the inverted bottle inside 2 other foam cups nested together (Fig. 2).
- If you don’t have 20-oz foam cups, use a liter beaker, a tall deli cup (Fig. 3), or a 4-cup measuring pitcher. If the inverted bottle needs to sit higher in order for you to view crystal formation, add some dry ice to the bottom of the container first.
Procedure
- Remove the chamber top (bottle bottom with sponge).
- Wet the sponge with tap water and replace the top.
- Wearing safety goggles and insulated gloves, place a small block or pellets of dry ice in a towel. Fold 1 end of the towel over the dry ice. Hit the towel numerous times with a hammer to crush the dry ice into a powder.
- Using a large spoon or scoop, add crushed dry ice around the growing chamber, up to the top of the cup.
- For insulation, cover the top of the cup with paper towels.
- Small ice crystals should start forming on the upper part of the fishing line in 5 to 10 minutes, with many others in about an hour. These formations are similar to real snowflakes. See Fig. 4.
- Check the dry ice periodically and refill as needed to maintain a constant level for cooling.
- You can take photos or record a time-lapse video of crystal formation by using a smart phone with a time-lapse app.
Extension Activity

Buy the Kit
Bundle includes 1 demonstration kit, Hot Demonstrations with Flameless Ration Heaters Kit (item #840323), and 2 classroom kits, Carolina ChemKits®: It’s Not the Heat, It’s Thermochemistry (item #840744) and Inquiries in Science®: Examining Thermochemistry Kit (item #251209). Classroom kit materials are sufficient for at least 30 students working in groups of 2 or 3.
We Save You Time
We are committed to providing the lab kits, instructional materials, and often free activities and supporting digital resources that do as much heavy lifting for you as we can.