Heat Transfer Between Components of a System
A Carolina EssentialsTM Activity

Total Time: 80+ mins
Prep: 45+ mins | Activity: 35-45 mins

Physical Science
9-12
High School
- Total Time: 80+ minutes [ Prep: 45+ mins | Activity: 35-45 mins ]
- Subject: Physical Science
- Grade: High School
Overview
This easy and inexpensive lab demonstrates the transfer of heat energy from a higher temperature substance to a lower temperature substance within the same system, establishing the second law of thermodynamics and the concept of thermal equilibrium. Schedule it as a class demonstration or as a small group activity.
Students generate temperature data, graph collected temperature data, and use the data to establish and explain the concepts of heat transfer and thermal equilibrium. After completing the data analysis, students use energy diagrams to visualize and explain changes in heat energy for each component of the system.
Phenomenon
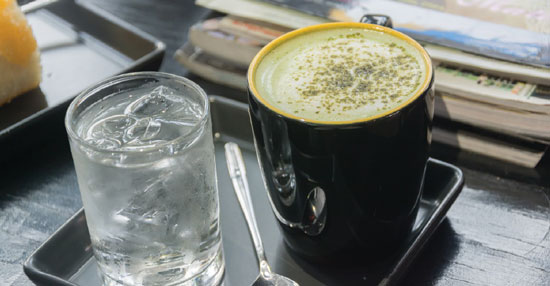
Ask students to generate a list of instances when 2 substances come together and the temperatures of both substances change. Identify the direction the thermal energy is traveling. Begin with the examples of butter melting on pancakes and ice melting in hot tea. Compile a class list and leave it available for students to see. They will use the list during the assessment portion of the activity.
Essential Question
How can evidence of heat transfer between components of a system be measured?
Activity Objectives
- Carry out an experiment and gather evidence of heat transfer when a cold substance is added to a room temperature substance.
- Carry out an experiment and gather evidence of heat transfer when a hot substance is added to a room temperature substance.
- Use graphical analysis to establish the position of thermal equilibrium for both conditions above.
Next Generation Science Standards* (NGSS)
PE HS-PS3-4. Plan and conduct an investigation to provide evidence that the transfer of thermal energy when two components of different temperatures are combines within a closed system results in a more uniform energy distribution among the components in the system (second law of thermodynamics).
SCIENCE & ENGINEERING PRACTICES
Analyzing and Interpreting Data
- Analyze data using tools, technologies, and/or models in order to make valid and reliable scientific claims or determine an optimal design solution.
DISCIPLINARY CORE IDEA
PS2.A: Forces and Motion
- Newton’s second law accurately predicts changes in the motion of macroscopic objects.
CROSSCUTTING CONCEPTS
Cause and Effect
- Empirical evidence is required to differentiate between cause and correlation and make claims about specific causes and effects.
Materials
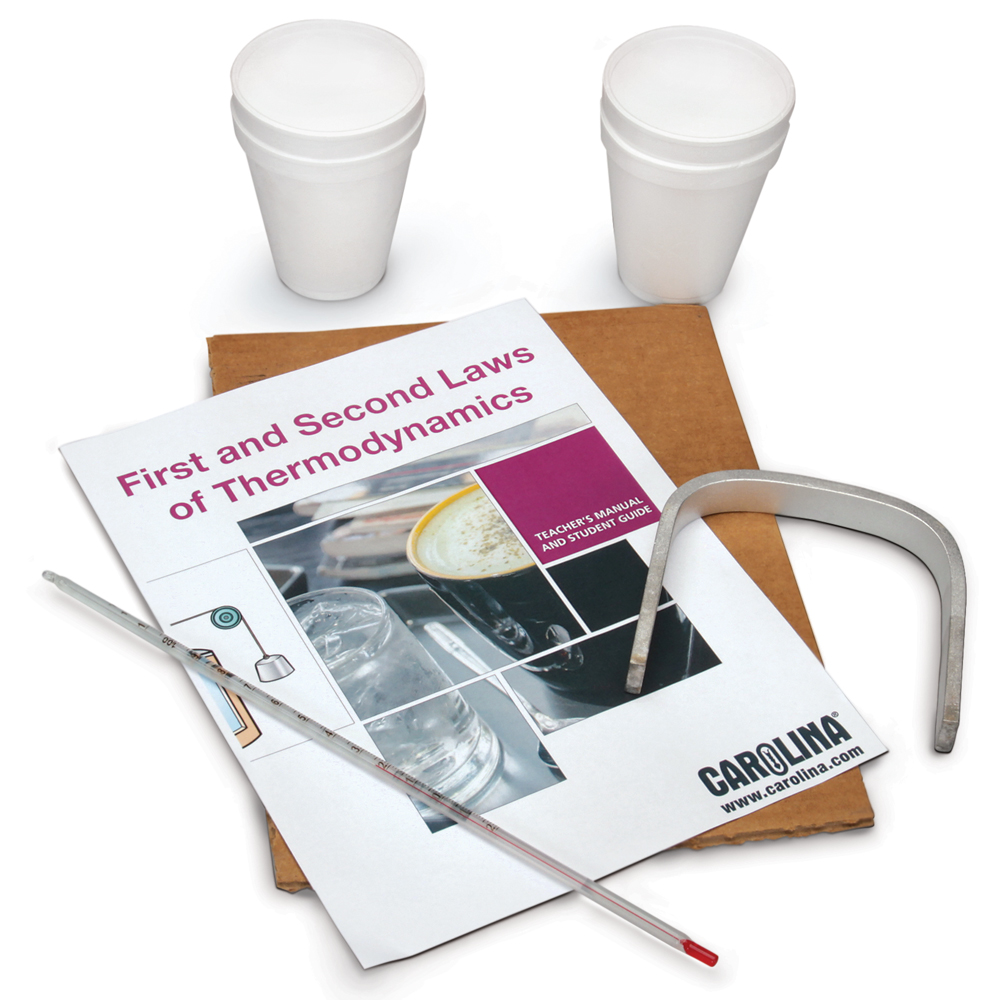
- 2 thermometers
- Temperature sensor (optional)
- Beaker, 1,000 mL (for heating water)
- Hot glove
- Cardboard
- Cup for preparing ice cubes, 6 oz.
- Graduated cylinder, 50ml
- 4 foam cups, 8 oz.
- Scissors
- Paper punch (single hole)
- Tap water, 100 ml
- Warm water, 50 ml
- Ice cube, 50 ml
Safety Procedures and Precautions
Students need to have proper eye protection for working with warm water and hand protection for pouring the warm water into a graduated cylinder and cup. Remind students of the proper use of thermometers.
Teacher Preparation and Disposal
The day before the activity, prepare a 50 mL ice cube for a class demonstration or a cube for each student group. Prior to the activity, warm enough water to supply the demonstration or each group with 50 ml of water. It should be approximately 30 to 40° C above room temperature.
No disposal is required. Calorimeters may be saved for additional activities. Preparing the cardboard tops for the calorimeter cups prior to the lab will save time.
STUDENT PROCEDURES
A. Construction of a closed system (calorimeter)
- Turn a foam cup upside down on the cardboard and trace around the cup.
- Cut out the circle.
- Use the paper punch to make a hole in the cardboard top that is slightly off-center.
- Place one cup inside the other and cap the cups with the cardboard top.
- Insert a thermometer into the hole in the cardboard top to make sure it fits.
B. System 1
- Measure 50 mL of tap water in the graduated cylinder and pour it into the inner cup of the calorimeter.
- Place the cover on the calorimeter and take the temperature of the tap water. Record the initial temperature on the data table.
- Measure 50 mL of warm water in the graduated cylinder.
- Take the temperature of the warm water in the cylinder. Record the initial temperature of the warm water on the data table.
- Remove the top of the calorimeter and quickly add the warm water to the tap water. Replace the cap of the calorimeter and stir gently with the thermometer.
- Record the temperature of the system every 30 seconds until the temperature is constant for at least 2 minutes.
C. System 2
- Measure 50 mL of tap water in the graduated cylinder and pour it into the inner cup of the calorimeter.
- Place the cover on the calorimeter and take the temperature of the tap water. Record the initial temperature on the data table.
- Obtain a 50 mL ice cube.
- Take the temperature of the ice cube. Record the initial temperature of the ice cube on the data table.
- Remove the ice cube from its cup.
- Remove the top of the calorimeter and quickly add the ice cube to the tap water. Replace the cap of the calorimeter and stir gently with the thermometer.
- Record the temperature of the system every 30 seconds until the temperature is constant for at least 2 minutes.
TEACHER PREPARATION AND TIPS
- To save time, you may want to have students (or an assistant) cut the foam cup caps the day before the activity. The thermometer holes may be pre-punched.
- Get the warm water up to the desired temperature prior to the activity.
- Make sure there is a hot/cold glove available, so students can pour water into their graduated cylinder.
- Set aside an extra 100 mL of warm water in case of spillage.
- Have students measure the temperature of the ice cube before removing it from the cup.
- Remind students to stir gently. They are not to use the thermometer to break up the ice cube.
- All water may go down the sink. Cups and cardboard lids may be reused.
Data and Observations
Analysis & Discussion
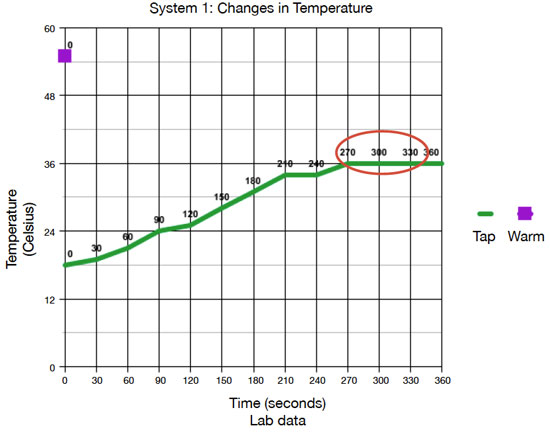
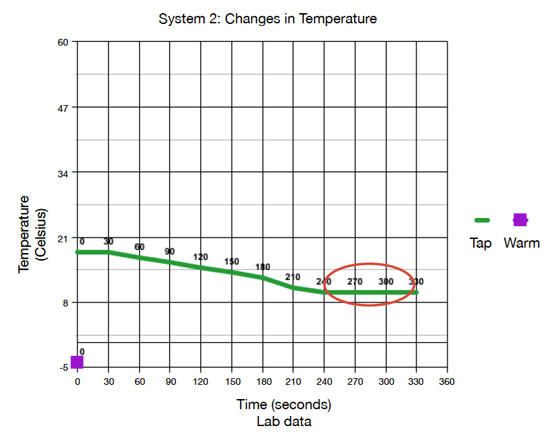
Define the system, its initial state, and final state for each experiment.
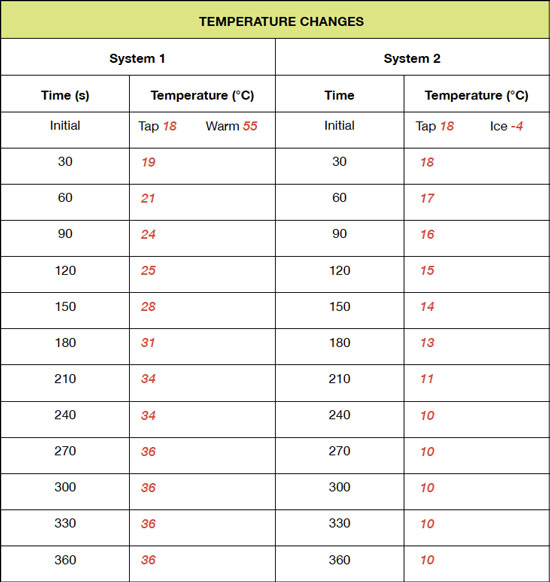
System 1 is the 50 mL of tap water initially at 18° C and the 50 mL of warm water initially at 55° C, which is contained by the calorimeter or foam cups. The thermometer interacted with the water in the system. The final state of the system at thermal equilibrium is 100 mL of water at 36° C. System 2 is the 50 mL of tap water initially at 18° C and the 50 mL ice cube initially at -4° C, which is contained by the calorimeter or foam cups. The thermometer interacted with the water in the system. The final state of the system at thermal equilibrium is 100 mL of water at 10° C.
For each system, explain in which direction heat flowed. Use your data to support your claim.
In system 1, heat flowed from the warmer water to the tap water. The data show that the temperature of the tap water increased, so thermal energy from the warmer water flowed into the tap water to warm it. In system 2, thermal water flowed from the tap water into the ice cube to warm/melt it. This is supported by the temperature of the tap water decreasing while the ice cube melted, indicating that the ice cube temperature increased.
On each graph, circle the location in which thermal equilibrium is reached.
See the graphs above.
On a molecular level, explain how thermal equilibrium is obtained.
The substance at the higher temperature has more kinetic energy (KE) than the substance at the lower temperature. As particles collide, kinetic energy is transferred from the substance with more kinetic energy to the substance with less kinetic energy. This process continues until all particles have about the same kinetic energy, which is defined as thermal equilibrium.
Use a series of energy diagrams to visualize the 2 processes of energy transfer in this activity.

SHOP THE KIT
SAFETY REQUIREMENTS
- Safety Goggles Required
- Safety Gloves Required
HELPFUL LINK
VIEW MORE ESSENTIALS
*Next Generation Science Standards® is a registered trademark of Achieve. Neither Achieve nor the lead states and partners that developed the Next Generation Science Standards were involved in the production of, and do not endorse, these products.

