A Model of Interacting Fields

A Carolina EssentialsTM Activity

Total Time: 30-45 mins

Prep: 30 mins | Activity: 30-45 mins

Physical Science, Physics

9-12

High School

Overview

This activity is a quick and inexpensive way to model the phenomenon of electric and magnetic field interaction. Students place small compasses on cardboard which is pierced by a copper wire attached to a battery. When the copper wire is attached to the battery, the compass needles align with the wire’s electric field. Students draw the compass needles to create a map of the interacting magnetic and electric fields. Field strength can also be modeled by moving the compasses further from the wire at incremental distances until the compass needles are no longer affected by the electric field.

Phenomenon

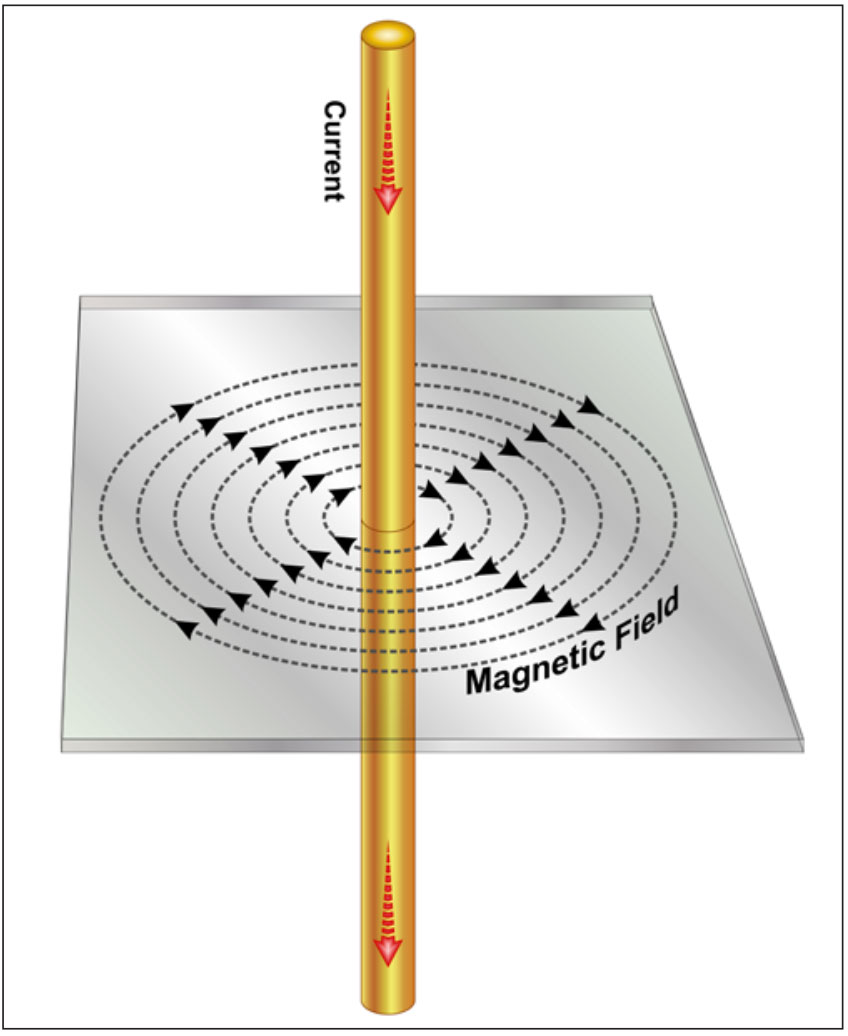
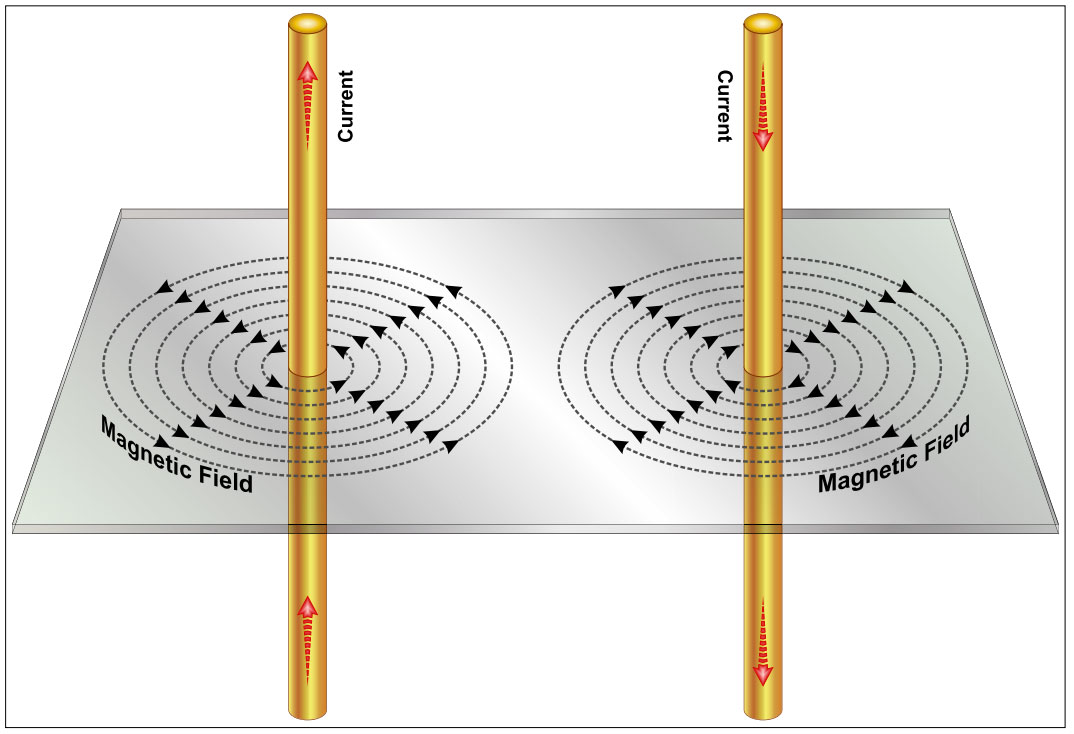
Interpret the following diagram.


diagram of interacting current and magnetic fields
 

Essential Question

How do the electric and magnetic fields interact between objects?

Activity Objectives

  1. Develop a model for the interaction of electric and magnetic fields in a single wire.
  2. Develop a model for changes in field strength for the interaction of electric and magnetic fields.

Next Generation Science Standards* (NGSS)

PE HS-PS3-5. Develop and use a model of two objects interacting through electric or magnetic fields to illustrate the forces between objects and the changes in energy of the objects due to the interaction.

SCIENCE & ENGINEERING PRACTICES

Developing and Using Models

DISCIPLINARY CORE IDEA

PS3.C: Relationship Between Energy and Forces

CROSSCUTTING CONCEPTS

Cause and Effect

Materials

Safety Procedures and Precautions

Examine all batteries prior to the activity. Properly dispose of or recycle any batteries that show signs of corrosion or leakage. Wear safety glasses.

Teacher Preparation and Disposal

To save time, pre-cut the cardboard or foam core board and the copper wire. Check the batteries for corrosion and strength. All materials may be reused.

STUDENT PROCEDURES

  1. Tape 2 sheets of paper together so they cover the cardboard.
  2. Secure the paper to the cardboard with one piece of tape per side.
  3. From the top side, gently push the copper wire through the paper and cardboard.
  4. Make 6 loops of tape, sticky side out.
  5. Attach the tape loops to the back of the compasses and evenly space them around the copper wire, approximately 5 centimeters from the wire.
  6. Make sure the cardboard is horizontal and parallel to the floor. Using a single colored pencil, sketch the direction of the compass needles directly on the paper. Label the north and south poles of the compass needles.
  7. Attach the leads with alligator clips to the battery as shown in the figure to the right.
  8. Attach one lead to the upper section of copper wire. Attach the other lead to the lower section of copper wire.
  9. Make sure the cardboard is horizontal and parallel to the floor. Using a different colored pencil, sketch the direction of the compass needles directly on the paper. Label the north and south poles of the compass needle.
  10. Switch the positions of the alligator lead clips. Move the top clip to the bottom and the bottom clip to the top.
  11. Make sure the cardboard is horizontal and parallel to the floor. Using a different colored pencil, sketch the direction of the compass needles directly on the paper. Label the north and south poles of the compass needle.
  12. Remove the leads from the copper wire.
  13. Carefully remove the compasses from the paper. Remove all tape from the paper and compasses. Remove the copper wire from the cardboard.
  14. Tape 2 sheets of paper together so they cover the cardboard. Tape the paper to the board.
  15. Re-insert the copper wire into the hole in the cardboard.
  16. Arrange the compasses around the copper wire—as close to the wire as possible—but do not tape them down.
  17. Hook the leads to the copper wire and sketch the directions of the compass needles.
  18. Reposition the compasses 2 centimeters further from the copper wire and sketch the directions of the compass needles.
  19. Continue moving the compasses in 2-centimeter increments and sketching the needle directions until the compasses reach the edge of the cardboard.
  20. Disconnect the alligator clips from the copper wire and the leads from the battery. Remove the copper wire and the paper from the cardboard.

TEACHER PREPARATION AND TIPS

  1. To save time, you may pre-cut the copper wire and cardboard/foam core board for students.
  2. Six small compasses around the wire provide more information than 2 larger compasses.
  3. If you use larger compasses, extend the size of the cardboard.
  4. If you use larger compasses, extend the size of the cardboard.
  5. Do not store the 9-volt batteries with the leads attached.

Data and Observations

diagram of interacting current and magnetic fields

All sketches should be color coded and identified by the steps with which they are associated.

In the first sketch, the compass needles should bepointing to magnetic north.

In the second sketch, the compass needles should be pointing in the direction of the magnetic field. Depending on the connection of the battery leads to the wire, all the needles will point clockwise or counterclockwise.

In the third sketch, the leads to the copper wires are reversed, so the direction of the magnetic field is reversed. If the second sketch showed a clockwise direction, the third sketch should show a counterclockwise direction.

Analysis & Discussion

1. Use your magnetic field map sketches to develop a model for the interaction of electric and magnetic fields in a single wire.

When there is no current running through the copper wire, there is no interaction between electric and magnetic fields, so the compass needles point toward magnetic north as expected.

When current runs through the copper wire, an interaction occurs between fields that is dependent on the direction of the current. The compass needles point in the direction that follows the right-hand rule.

2. Develop a model for changes in field strength for the interaction of electric and magnetic fields.

The further the compasses are from the current in the copper wire, the weaker the interactions are between fields.

*Next Generation Science Standards® is a registered trademark of Achieve. Neither Achieve nor the lead states and partners that developed the Next Generation Science Standards were involved in the production of, and do not endorse, these products.

Subscribe to Newsletter

Sign up for free resources delivered to your inbox!

This website uses cookies to improve your experience. We'll assume you're ok with this, but you can opt-out if you wish. Accept Read More