Science Laboratory Drawing: Encouraging Students to Observe
A picture is still worth a thousand words, especially in science classes where lab drawings can relate confusing information to a whole class without exhaustive explanations. Science laboratory drawings can serve as two-dimensional models to simplify and explain complex laboratory equipment setups, illustrate step-by-step procedures for a scientific experiment, and identify key structures of biological specimens. Lab drawings in course lab manuals, classroom charts, infographics, fill-in templates, and 2-D illustrated models help beginners learn and review a wide variety of scientific systems. Using their own observations to hand-draw specimens, apparatus, or lab setups, students can magnify familiarity and understanding, which can generate interest and mastery in the subject.
Science Laboratory Drawing: Encouraging Students to Observe
Most students can sketch to some degree, and even quick doodles, line art, and vector diagrams add information and details that students need to recall, explain, and use at a later time. Instructors should not stress quality and drawing ability but should encourage students to represent their observations to enhance their own understanding. Increasing understanding is the reason students need to draw in science lab. Reviewing professional illustrations will help students identify which structures to look for and will also show how someone else has interpreted them on paper. Many students already may have the fundamental skills of drawing; however, the instructor can introduce the techniques of rendering more accurate scientific drawings. Talented art students with interests in science may even be interested in art school and a career in medical illustration or technical graphic design.
What Are 5 Guidelines for Scientific Drawing?
- PERSPECTIVE
An understanding of perspective will help students render the subject in a more visually pleasing manner. Linear perspective deals with the apparent sizes and proportions of objects seen from a distance. A classic example is a railroad track or telephone poles converging in the distance.
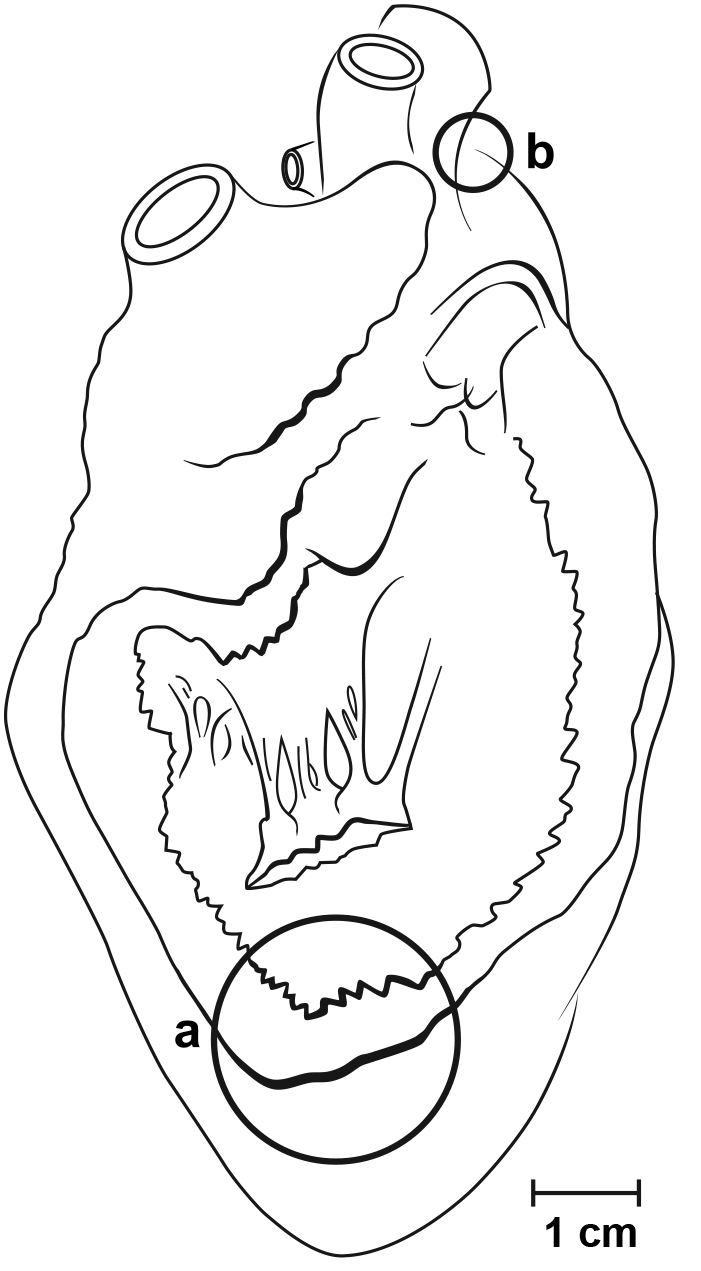
Most laboratory subject matter is viewed at close range, so size differences may not seem obvious. Therefore, aerial perspective, looking at the subject from above, is most often used for objects below and close to the viewer. For black-and-white drawings, the nearest parts are given the thickest lines and strongest value differences (Fig. 1a). The parts farthest away are treated with lighter lines and less detail. A distant structure that passes under or behind a closer structure can be shown by stopping the line just short of the point at which the two parts meet (Fig. 1b). - BASIC MATERIALS
Students need a metric ruler, 2 pencil, colored pencils, erasers, and dividers. Simple dividers can be made with two sharpened tongue depressors connected by a thumbtack. A metal compass can also serve as a divider. A hand lens and sketch book are ideal for notes, science lab drawings, and keeping work organized.

- LINE DRAWINGS
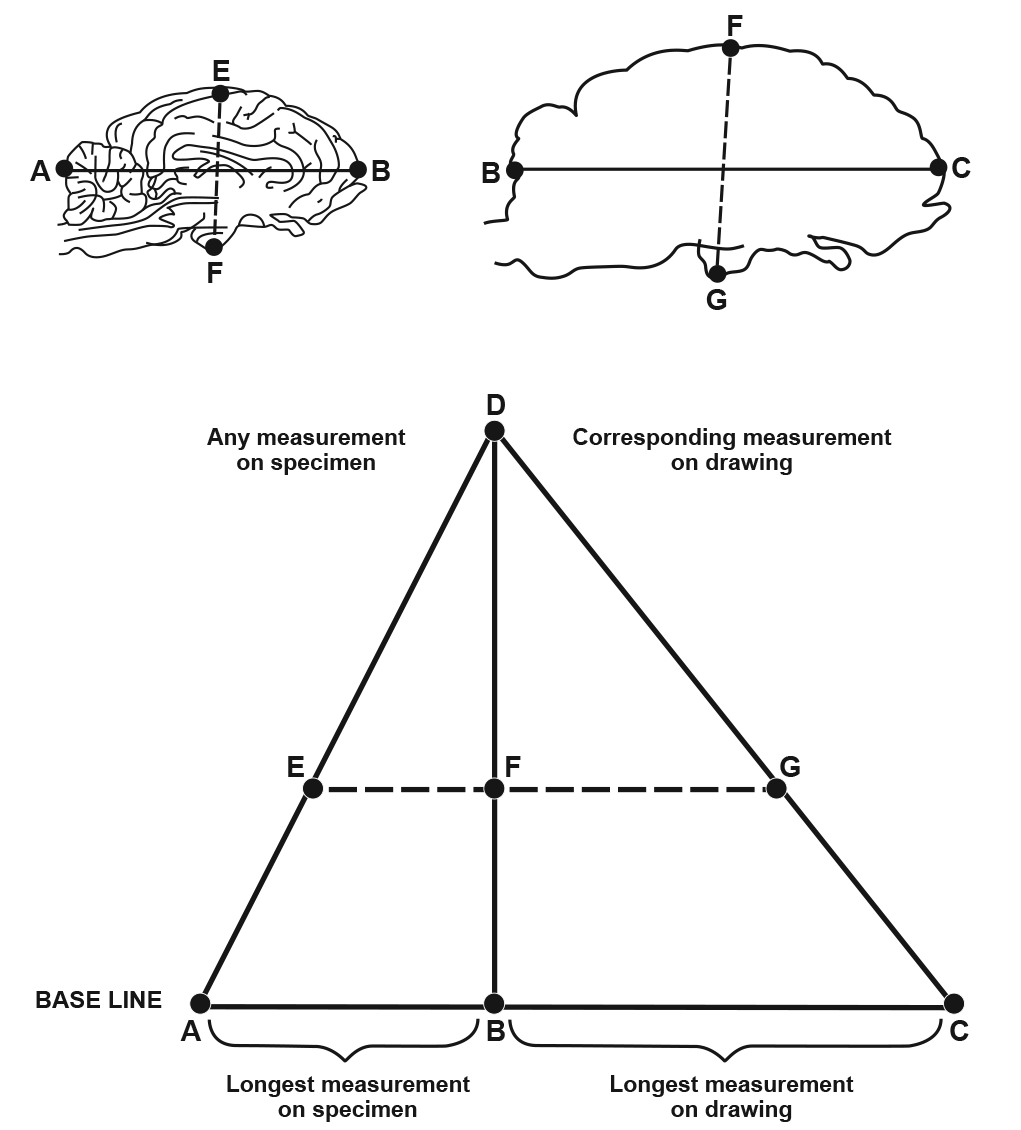
Beginners’ first drawings can be done on a one-to-one scale—that is, a direct copy of the subject. Later drawings may be enlarged or reduced by using the dividers and ruler to construct a simple diagram (Fig. 2). Microscopic subjects need to be enlarged proportionately. Microscopes can be equipped with ocular micrometers for making measurements and may allow the student to view a specimen in either a brightfield or darkfield, enhancing details.
Take all measurements in the same plane to make a hand-drawing of “what is seen”; this takes into consideration the foreshortening effect of perspective. For instance, even though the height of each telephone pole is the same and the true distance between each pair of telephone poles is equal, they are drawn progressively smaller and closer together to give the appearance of depth on a two-dimensional surface.
Whether the student is drawing a living specimen, a lab experiment, or a field study setting, the subject should be kept at a constant position and distance from the eye. Viewing an object too closely results in a distortion. The closer the object is to the eye, the more pronounced the distortion. Closing one eye helps overcome the effects of parallax distortion. Measurements should always be made monocularly with the same eye.
Begin drawing by “blocking-in” the subject’s length and width. Open the dividers to correspond to the dimensions of the specimen and measure the opening for each. These measurements should be noted in the margins. To determine reference points within the block, mark off the length and width of various structures and their relative distances from each other with the dividers. Lightly sketch in guidelines.
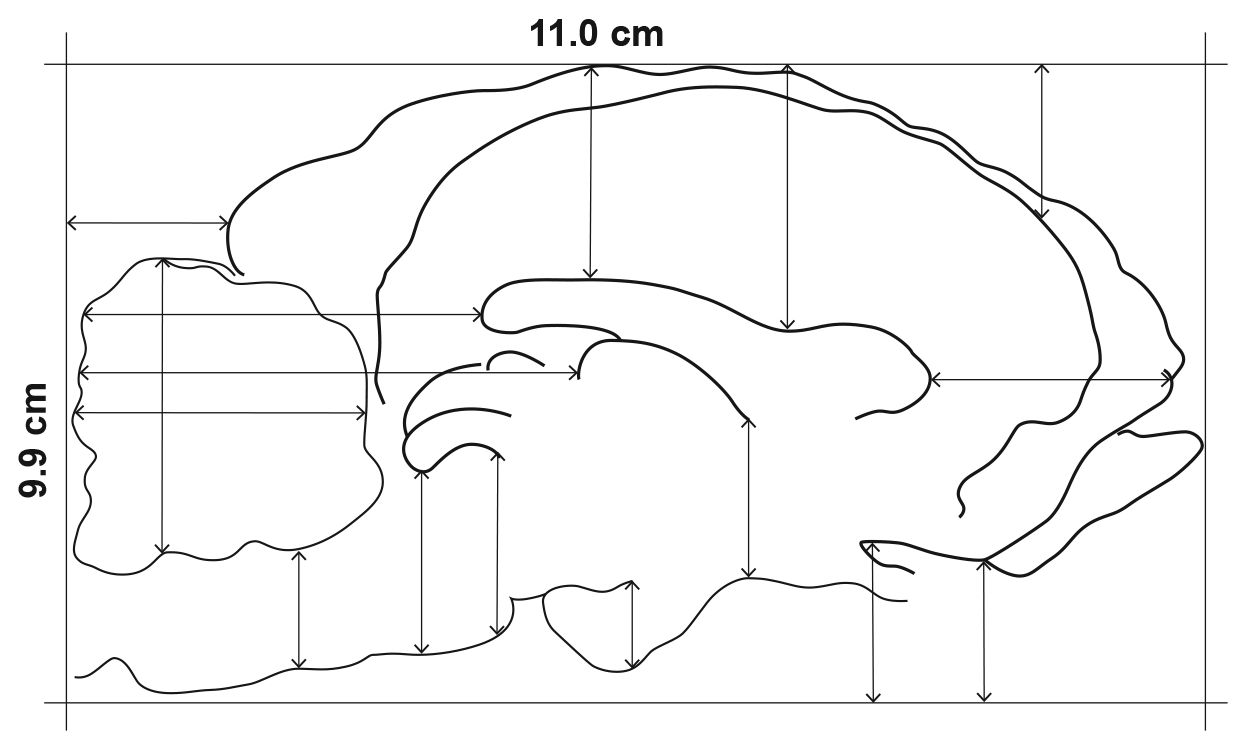
After plotting the basic measurements, draw contour lines connecting the reference points (Fig. 3). The student should try to think of the object in silhouette and let their eye and pencil follow the outer edge. Overlapping contour lines and varying line thicknesses help show which structures are nearer. After erasing lightly sketched guidelines and the “blocking-in” lines, the drawing may be considered complete and ready to be neatly labeled. Scale bars should be included with most scientific drawings. The addition of color, where appropriate, can communicate details also. A particular hue of green can distinguish a pine from an oak, and the hue and intensity of a reagent can help indicate its identity and concentration.


- TEXTURE AND SHADING
If texture and shading are desired, several techniques can be used. It is best to keep these to a minimum.- Line or Crosshatch Shading
This shading consists of mostly parallel lines tapered at the ends to show gradation or overlapped to show deep shadows . The direction and character of the lines should help to define the shape and natural contours. A soft pencil works well for this type of shading; for an exceptionally good drawing, the student may transfer their sketch to better-quality paper and render it in ink.
A variety of grounds (papers) work well with ink. Tracing vellum and frosted films allow the drawing to be inked directly over the sketch. Clay-coated grounds, such as scratch board, allow ink to be scraped very precisely from the surface. Crow quill pens or a fine-pointed brush and black India ink are recommended. - Stipple Shading
Stippling consists of a series of dots, denser for darker values and less dense for lighter areas. It is useful for depicting surface variation and smooth textures. Stippling should be limited to small areas as it is tedious and time-consuming. - Pencil Shading
A soft pencil held with the broad side of the lead on the paper can be the easiest and most effective method of shading. Paper stumps or the fingers can be used for softening the shadows. - Carbon or Graphite Dust Shading
This is a technique used by professional scientific illustrators that is relatively simple and produces very pleasing effects. A pile of dust from a soft carbon or graphite pencil is collected by rubbing the pencil on a piece of sandpaper. This serves as a palette, and the dust can be brushed on paper with a small dry paintbrush. Highlights can be lifted out with a paper stump, piece of chamois cloth, or a kneaded rubber eraser.
- Line or Crosshatch Shading
- FINISHING TOUCHES
For permanence, drawings can be sprayed with a clear fixative to prevent smudging and can be mounted and flapped (covered with a piece of paper taped at the top). For exhibition, they may also be matted. Students may wish to sign and date their drawings for future reference.
Science Lab Drawing Activities
Here are some of our favorite lab drawing activities to encourage students to observe keenly and draw, with hopes of increased, deeper understanding of science concepts and processes.
- Have students generate a personal set of science icons to represent typical instructional tasks.
- Create hand-drawn flash cards of chemistry lab equipment such as beakers, test tubes, types of flasks, and graduated cylinders with their names and appropriate uses for quick reference.
- Healthcare science students can sketch and label body systems with structures and corresponding functions for test review.
- Physics and biotechnology students can illustrate detailed step-by-step lab procedures in a flowchart template, allowing for quick and easy revisions and also serving as a tutorial for students who may have missed lab.
This article was originally published as “Basic Laboratory Drawing” in Carolina Tips®, Vol. 44, No. 10 (print version, October 1981); it was revised July 2025.
Further Reading
Dance, S. Peter. 1978. The Art of Natural History: Animal Illustrators and Their Work. New York: The Overlook Press.
Wood, Phyllis. 1979. Scientific Illustration: A Guide to Biological, Zoological, and Medical Rendering Techniques, Design, Printing, and Display. New York: Van Nostrand Reinhold Company.
Additional sources:
“Introduction to Scientific Sketching,” California Academy of Sciences (website), accessed August 19, 2025, https://www.calacademy.org/educators/lesson-plans/introduction-to-scientific-sketching.
“Quick Guide to Scientific Drawing,” Orange County Department of Education (website), accessed August 19, 2025, https://ocde.us/ito/Documents/ScientificDrawing.pdf.
About The Author
Carolina Staff
Carolina is teamed with teachers and continually provides valuable resources–articles, activities, and how-to videos–to help teachers in their classroom.

